
How to prepare a bombon coffee?
The café bombón is a sweet sensory experience and is traditional in the Spanish Levante region. This is the result of mixing the intense flavour of
If you are a coffee lover and you usually prepare them at home with foam, you may be interested to know that you can give them a personalized touch. In this article we will show you how you can draw with the foam on the coffee or make latte art and get a very aesthetic touch.

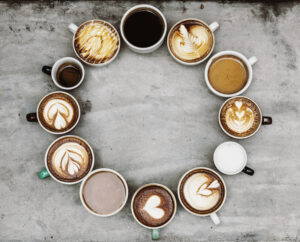
The art latte or latte art is a trend that emerged a few years ago, and that still remains as something completely normal. This trend consists of preparing coffee with drawings in the foam or milk cream, achieving figures in the coffee and making the experience of consuming this type of beverage much more attractive.
A fundamental aspect to achieve drawings in the coffee is to achieve a much denser and firmer texture in the milk. However, the way in which the foam is poured over the milk will also play a fundamental role.
In order to draw figures in coffee, it is recommended that you choose coffee with milk, cappuccino or latte macchiato, since they generally have more milk and are usually consumed in larger cups, so it will be easier to obtain figures in the coffee.
Step 1: Prepare coffee
First of all you must prepare coffee, the star ingredient. Do it as you would normally do it.
Step 2: Prepare textured milk
This step will vary depending on the utensils that you have at your disposal, in case you have a traditional coffee maker you will have to texturize the milk, on the other hand, if you have a professional coffee maker or one specialized in more sophisticated coffees, you will only have to press the button that it has to froth the milk.
In the case that you must manually texturize the milk because you have a traditional coffee maker, we recommend that you use fresh whole milk that is very cold. The milk should be poured into a metal jug, so that the froth can be formed. With the help of a milk froth mixer you should increase the density and creaminess of the milk to achieve a good result.
Another option that you can use to texturize the milk is to heat it until it reaches a temperature of 140 degrees and froth this milk by introducing it into an airtight jar and shaking it until you get a dense foam.
Step 3: Elimination of air bubbles
In order to obtain an extremely creamy foam it is recommended that, once we have the texturized milk, we give a sharp blow against the table and then turn the contents in circles, so that the air bubbles are lost. This movement must be continuous to achieve a good result.
Step 4: Drawing
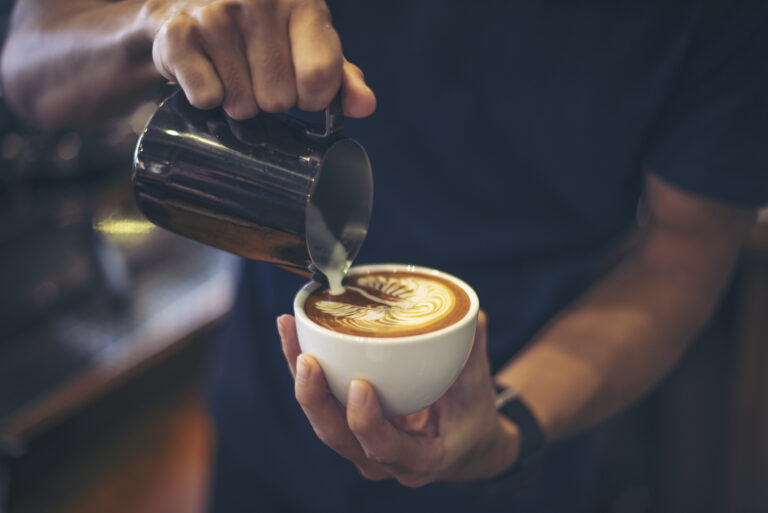
Finally we have arrived at the desired moment to make drawings in the coffee with milk. To do this you must incorporate the milk that you have prepared, through a small zigzag movement, along the edge of the cup. When you see that the milk remains in the center of the cup (moment called “free pouring”), appearing a circle of white milk over the color of the coffee, you should change the type of movement.
The next movement you have to do consists of short and tilted strokes that allow you to draw everything you want to draw: flowers, hearts, faces, etc. However, if you have a bad hand you can also use stencils to make this work easier.
Once you have the drawing you want, there is only one thing left to do: Enjoy!
The café bombón is a sweet sensory experience and is traditional in the Spanish Levante region. This is the result of mixing the intense flavour of

Some people may think this is a stupid question, but it’s not. Have you ever wondered whether decaffeinated coffee has caffeine? If so, read on

Coffee is the quintessential beverage that gets those who find mornings difficult to get up on their feet. The stimulating effect of coffee is well

Do you like to drink coffee with milk? Cow’s milk doesn’t agree with you, does it? Then you’re sure to drink your coffee with vegetable

Milk is one of the ingredients that is totally dispensable for the most purist coffee drinkers, since they consider that it adulterates the flavor and

For many people, coffee is all they need to start a day in the best way possible. Or at least to make their day less